2. User Interface (UI)
Before writing any code, you'll need to set up the User Interface for the app. The reason for doing this is that when you write the code, Android Studio will expect the UI Elements (Buttons and TextViews)
There are a number of approaches to designing this UI, using different layout managers, however this tutorial has used a TableLayout to display the required elements in an ordered fashion. Depending on how you extend this app, you may need to change this to another layout manager; for instance LinearLayout, RelativeLayout etc.
Your UI design will depend on the version of Android you are targeting and the elements may look different between versions.
At the end of this tutorial, your UI should look similar to the following image.

2.1 View the Text Editor
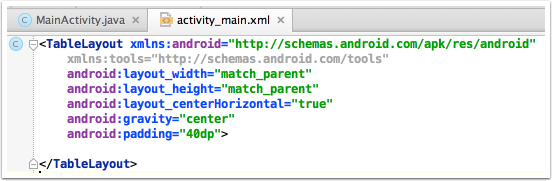
In the activity_main.xml file, click on the Text tab to open the Text Editor for the User Interface. You'll see that the XML is already defined for a Relative Layout and that there is already the initial configuration there.
Change the Relative Layout to a TableLayout and change the settings so it fills the screen of the device and is centred.
This simply tells the device that the overarching layout manager will be a Table Layout and to fill the available screen. Android allows for nested layouts so you can add a Relative Layout inside a Table Layout if you want more flexibility in a certain area of the view.
2.2 Add the Table Rows
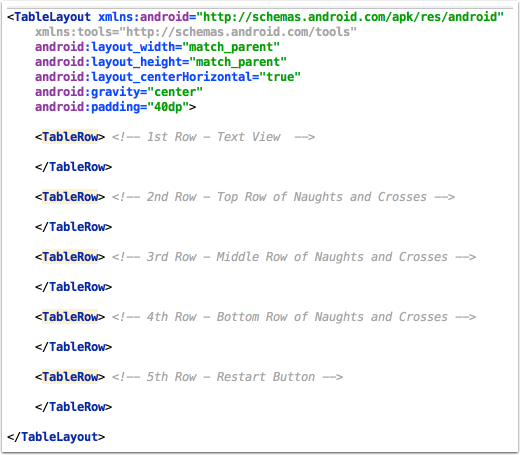
Tables Layouts have Table Rows (similar to a spreadsheet) and in this app you will need five rows.
Row 1 - The Text View to give information to the user, such as whose turn it is and who won.
Row 2 - The top row of the cells for Naughts and Crosses
Row 3 - The middle row of the cells for Naughts and Crosses
Row 4 - The bottom row of the cells for Naughts and Crosses
Row 5 - The restart button
Add the rows into your XML, making sure to close each tag that is opened.
2.3 Add the TextView
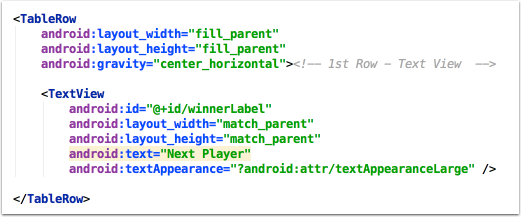
In the first Row, you'll need to add a TextView element to display information to the user.
Add the following code to the first Table Row.
For the moment, ignore the warning on the android:text attribute. You will fix this later in the tutorial.

2.4 Configure the First Row
Before moving onto the other rows, you'll need to configure the TextView to display in the centre of the screen.
Add the following configuration attributes to the TableRow to centre the contents.
The layout_width and layout_height attributes are set to "fill_parent" which simply means that the size of the row will be set to the same dimensions as the parent tag, in this case TableLayout.
The gravity attribute places the row in the centre along the horizontal axis of the parent tag.
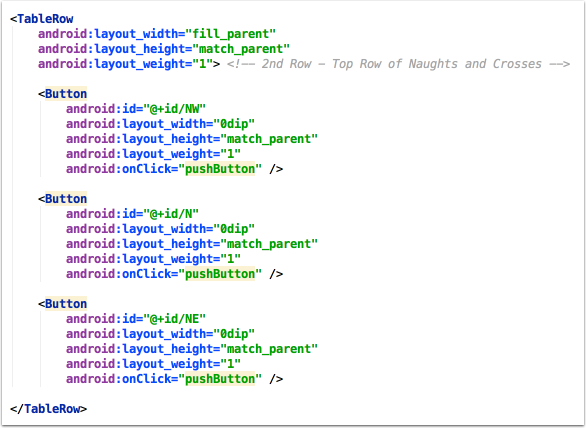
2.5 Check the Preview
Click on the Design tab of the UI file and you should see your screen looks like the following image.
Note that it may appear slightly differently, depending on the API version of Android you have selected. The following image is displayed as API 21.

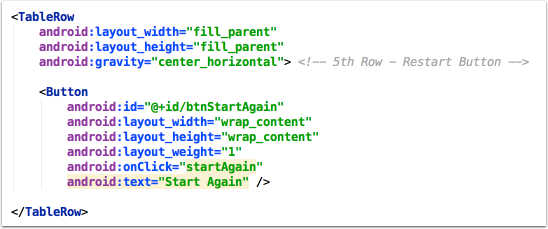
2.6 Configure the Fifth Row
Set the Attributes of the TableRow tag for the fifth row to the be the same as the first row.
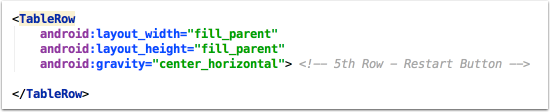
2.7 Add the Button
Add the button tag and attributes to the fifth row in the TableLayout.
The onClick attribute sets the method that will run when the user taps the button. Later in the code, you'll create a method called "startAgain(View v)" which is run.
Ignore the warnings that appear - these will be fixed later.
2.8 Check the Preview
Click on the Design tab of the UI file and you should see your screen looks like the following image.
Don't worry that the Text and the Button appear next to each other. The Naughts and Crosses buttons will appear inbetween them later, but no gap is displayed as you haven't finished the rows yet.
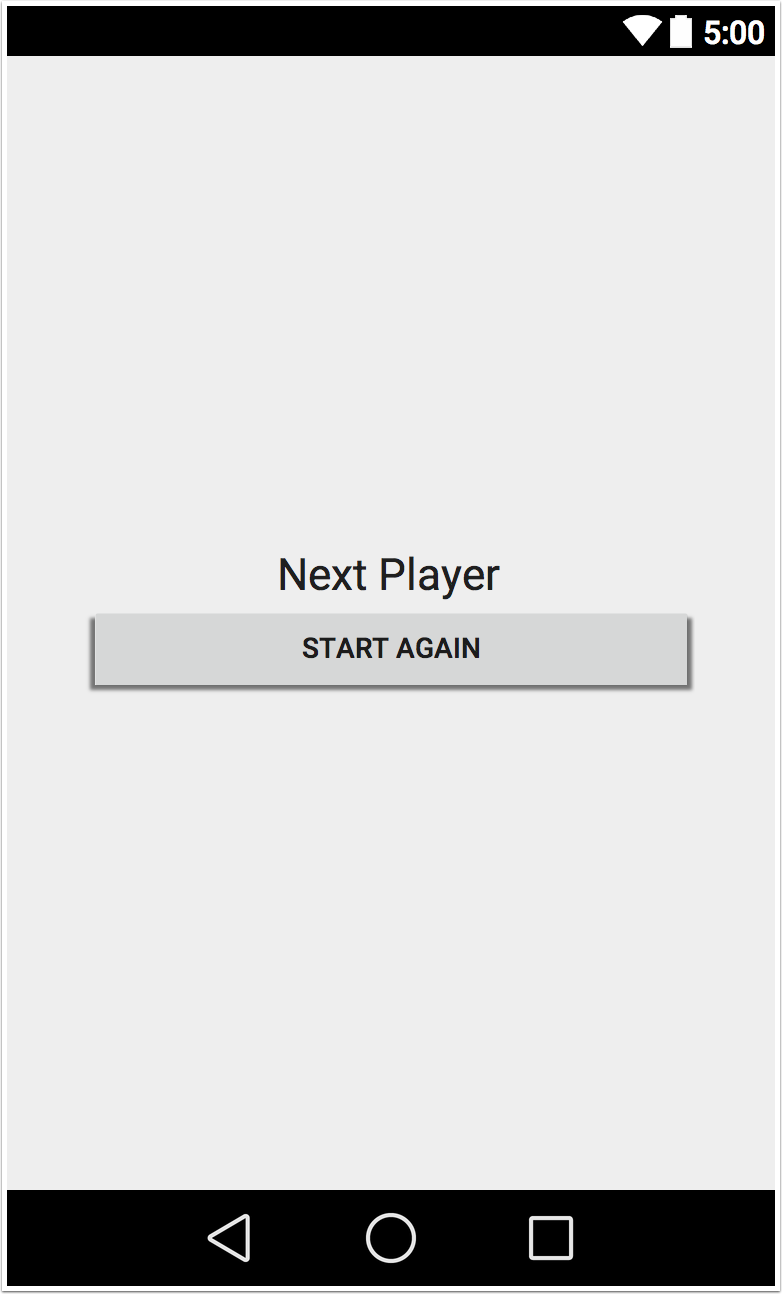
2.9 Configure the middle rows
Now to create the top row of buttons for Naughts and Crosses!
In the text editor for the XML, find the TableRow tags for the 2nd, 3rd and 4th rows and enter the following attributes.
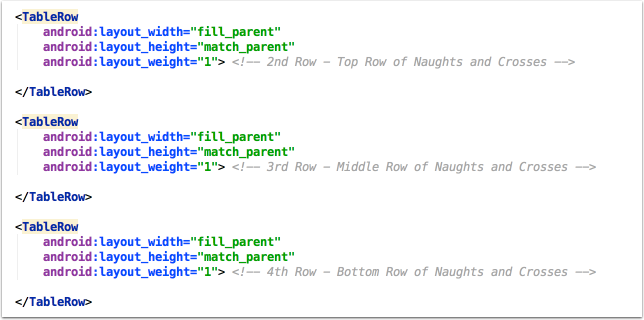
2.10 Add buttons on the second row
You can now add the buttons for the user to tap to select the position they wish to play.
In order for the java code to identify each button, an id attribute must be set. It is up to you to decide what the standard is for naming the buttons, but in this tutorial the names have been set similar to a compass. Therefore the buttons are named as such:
 NW  N  NE
 W   C  E
 SW  S  SE
Inside the TableRow tag for the second row, add three buttons and their attributes to fill that row.
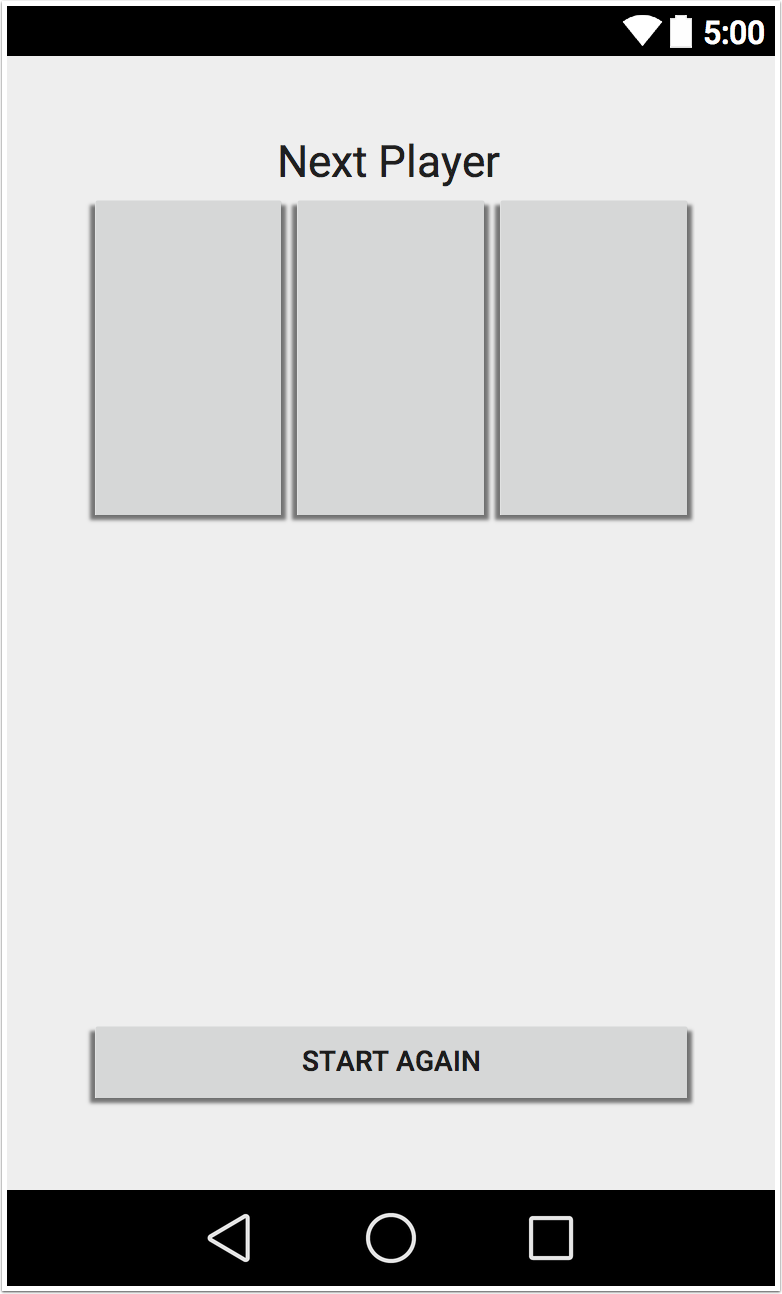
2.11 Check the Preview
Now that you've created the first row of buttons, you can change to the design view and see how that row of buttons will be displayed.
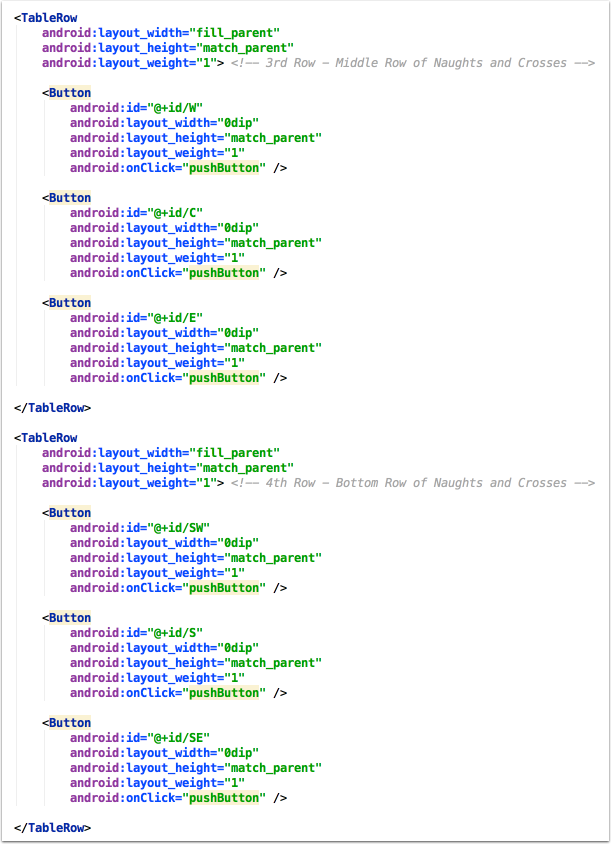
2.12 Complete the other two rows
The code for the second two rows is similar with only the id's changing for each button.
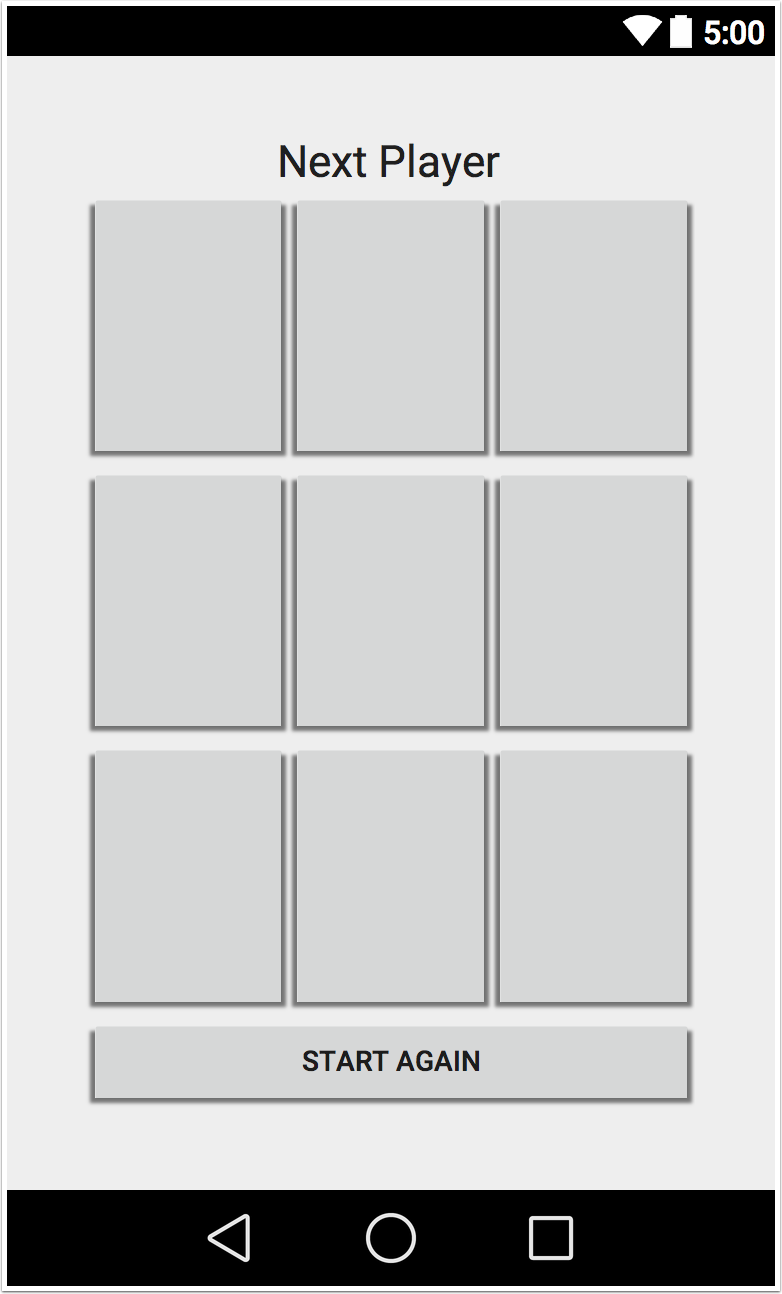
2.13 Check the Preview
Now that all the XML code has been completed, check the Design view of your UI and it should appear similar to the following.
2.14 Final XML code
Your final XML code for the UI should be as follows:
 <TableLayout xmlns:android="http://schemas.android.com/apk/res/android"
     xmlns:tools="http://schemas.android.com/tools"
     android:layout_width="match_parent"
     android:layout_height="match_parent"
     android:layout_centerHorizontal="true"
     android:gravity="center"
     android:padding="40dp">
     <TableRow
         android:layout_width="fill_parent"
         android:layout_height="fill_parent"
         android:gravity="center_horizontal"><!-- 1st Row - Text View  -->
         <TextView
             android:id="@+id/winnerLabel"
             android:layout_width="match_parent"
             android:layout_height="match_parent"
             android:text="Next Player"
             android:textAppearance="?android:attr/textAppearanceLarge" />
     </TableRow>
     <TableRow
         android:layout_width="fill_parent"
         android:layout_height="match_parent"
         android:layout_weight="1"> <!-- 2nd Row - Top Row of Naughts and Crosses -->
         <Button
             android:id="@+id/NW"
             android:layout_width="0dip"
             android:layout_height="match_parent"
             android:layout_weight="1"
             android:onClick="pushButton" />
         <Button
             android:id="@+id/N"
             android:layout_width="0dip"
             android:layout_height="match_parent"
             android:layout_weight="1"
             android:onClick="pushButton" />
         <Button
             android:id="@+id/NE"
             android:layout_width="0dip"
             android:layout_height="match_parent"
             android:layout_weight="1"
             android:onClick="pushButton" />
     </TableRow>
     <TableRow
         android:layout_width="fill_parent"
         android:layout_height="match_parent"
         android:layout_weight="1"> <!-- 3rd Row - Middle Row of Naughts and Crosses -->
         <Button
             android:id="@+id/W"
             android:layout_width="0dip"
             android:layout_height="match_parent"
             android:layout_weight="1"
             android:onClick="pushButton" />
         <Button
             android:id="@+id/C"
             android:layout_width="0dip"
             android:layout_height="match_parent"
             android:layout_weight="1"
             android:onClick="pushButton" />
         <Button
             android:id="@+id/E"
             android:layout_width="0dip"
             android:layout_height="match_parent"
             android:layout_weight="1"
             android:onClick="pushButton" />
     </TableRow>
     <TableRow
         android:layout_width="fill_parent"
         android:layout_height="match_parent"
         android:layout_weight="1"> <!-- 4th Row - Bottom Row of Naughts and Crosses -->
         <Button
             android:id="@+id/SW"
             android:layout_width="0dip"
             android:layout_height="match_parent"
             android:layout_weight="1"
             android:onClick="pushButton" />
         <Button
             android:id="@+id/S"
             android:layout_width="0dip"
             android:layout_height="match_parent"
             android:layout_weight="1"
             android:onClick="pushButton" />
         <Button
             android:id="@+id/SE"
             android:layout_width="0dip"
             android:layout_height="match_parent"
             android:layout_weight="1"
             android:onClick="pushButton" />
     </TableRow>
     <TableRow
         android:layout_width="fill_parent"
         android:layout_height="fill_parent"
         android:gravity="center_horizontal"> <!-- 5th Row - Restart Button -->
         <Button
             android:id="@+id/btnStartAgain"
             android:layout_width="wrap_content"
             android:layout_height="wrap_content"
             android:layout_weight="1"
             android:onClick="startAgain"
             android:text="Start Again" />
     </TableRow>
 </TableLayout>